Home Blog Page 79

Tips for Summer Travel with Your Pet

0
Tips for Summer Travel with Your Pet
Summer Travel with Your Pet Should be Fun & Stress-Free

The warm summer months call for some fun traveling with loved ones, however, trips can be less fun if four-legged family members aren’t able to come along. Pet parents already know not to leave pets in the car on a hot day, but there are other factors to consider when your pets are tagging along for the ride.

“Your pet’s safety and comfort while traveling are extremely important to help reduce stress for both the pet and owner,” said Jam Stewart, director of corporate communications at Mars Petcare. “Creating a safe space for your pet to travel not only shows responsible pet ownership, but also allows additional quality time for you and your furry best friend.”

Keep these tips in mind when taking your pet on vacation this summer:

  • Be sure your furry friend can join you in all areas. Unfortunately, not all accommodations love pets as much as pet owners do. Don’t forget to call ahead to the places you plan to visit to be sure your furry loved ones are welcome. It’salso imperative for owners to understand any rules for their pets at their destination, like keeping their pets on a leash. Making sure your pet is well socialized and comfortable visiting unfamiliar places also helps make the new experience fun and positive for your pet and for you.
  • Don’t forget your pet’s ID. Microchipping your pet is one of the most effective ways to ensure he or she can be reunited with you if lost. Combine it with on-collar identification tags and a GPS pet tracker, such as Whistle 3 GPS Pet Tracker, which lets owners track their pets wherever their travels take them.
  • Make sure your pet is comfy on road trips. It’s important to introduce your pet to your car slowly before embarking on a long adventure. You can also bring your pet’s favorite toys, blankets or bed to help him or her feel more at ease. If your pet is still uneasy in the car, your veterinarian can provide options like essential oils, over-the-counter supplements or, if needed, prescriptions.
  • Don’t forget the treats. While traveling, make sure your pet has healthy treats for the long ride. Treats such as Greenies and Pedigree Dentastix promote fresh breath and clean teeth for dogs. For treats your cat will love, try Temptations, which offers tasty treats in multiple flavors.

“Pets make our lives healthier, safer and happier, and owners should take the time to plan properly before heading out on the road with their pets to ensure a fun, safe and comfortable trip for all,” Stewart said. “Pets are part of the family and we want them to enjoy the trip as much as we do in order to have more opportunities to introduce them to new experiences and places.”

For additional pet care tips, visit bettercitiesforpets.tumblr.com.

Photo courtesy of Shutterstock

SOURCE:
Mars Petcare

10 Tips to Make Outdoor Parties Unforgettable

0
10 Tips to Make Outdoor Parties Unforgettable
Tips to Help Make Your Next Outdoor Party Unforgettable

Entertaining is one thing, but dazzling your guests with an outdoor party sensation is another. Summer can be the best time of year for outdoor parties. From twinkling lights to patterned tablecloths, every detail counts when it comes to impressing family and friends.

It may feel like a lot of pressure to live up to expectations, but your party can be both simple and elegant with a few easy tips.

Start early
Early is never early enough when it comes to planning a rock-star summer gath­ering. Check to see if you have enough utensils, make sure everything is in place and that there is enough food for your guests. Prepare weeks in advance, if possible, to make sure you have all the materials necessary to throw your dream outdoor party.

Spice up the invitations
The perfect invitations can do three things. First is tell the basics: what, when and where. They can also tell guests what to bring along with them. Of course, invitations should also be appealing to the eye. This is your time to get a little creative and catch guests’ attention before the big event.

Show your style
You want your guests to be as comfortable as possible. Make sure to dress tables and chairs with cushions and tablecloths. Mix it up and show off some of your personal flair with bright colors or fancy patterns. It’s easy to celebrate summer with styles that bring summer vibes to life.

Light up the party
Brighten up the big day or night with some candles, lanterns or sparkling lights. In case of wind or weather, try to purchase covered candles to increase the chances the flame will stay lit. Make sure everyone can see the hard work you have put into the party.

Less mess meals
No one likes messy meals, especially at a summer party. Put together a menu that isn’t stressful on the cook or stressful on your guests to eat. Dropping sauce on a white summer top is a party no-no.

Rain, rain, go away
Always prepare for the worst. If clouds roll in on party day, make sure you’re ready. You can simply move the party indoors at the drop of a hat. Tents can also help keep the party going outdoors in case of precipitation.

Brighten it up
It’s finally summer and that usually means flowers everywhere. Pick out an arrangement and make it the focal point of each table. The bright colors can draw your guests in and make them want to appreciate the beautiful nature around them.

Make your own games
Give the kids something to do and make it fun. While the adults visit, the little ones need something to keep themselves busy. Whether it’s bubbles or water play in the heat, something to mix it up can help keep them occupied.

Jam it out
Keep the music low and cool. There is no need to blast your speakers across the entire yard. Play your favorite jams, but nothing too crazy. The music can really set the mood of the entire party and make or break the atmosphere.

Cool it down
The summer heat is blazing and sometimes being outside can be miserable. Make sure your guests stay comfortable, even in the heat. Lay out handheld fans, lots of water and even some towels. Your guests will want to stay hydrated so they can party on.

Find more summer party tips at eLivingToday.com.

Secrets for Mastering the Grill

With warmer temperatures and sun-filled days arriving, there are few better ways to celebrate the summer season than by firing up the grill. Whether preparing a simple dinner at home or a backyard bash for a crowd, grilling is an easy way to add sear and flavor to your favorite meats and vegetables.

The perfect party, regardless of the number of guests, requires proper preparation, attention to detail and a few handy tricks around the grill to serve up delicious options for all in attendance. However, hosting a great get-together doesn’t have to be complicated.

To up your grilling game this summer, try these tips from Chef Rick Bayless of Macy’s Culinary Council, a national culinary authority featuring some of the nation’s leading chefs.

Use the Right Tools
Aside from fuel, there are several cooking tools that are essential for grilling, including a meat thermometer, long-handled spatula and tongs, grill mitts and a grill brush. Bayless’s go-to gadgets are a basket to prepare whole fish and a cast-iron grill grate to achieve marks and depth of flavor.

Get to Know the Fire
When grilling for a party, planning ahead is key, according to Bayless. It can be helpful to know the hot spots of the grill and the distance from grates to flame. Start early if roasting a larger piece of meat, while thinner cuts can be thrown on the grill after the party begins and your guests arrive.

Keep it Simple
Bayless recommends a simple menu that features tried and true flavor profiles nearly everyone loves. For appetizers, he suggests grilling vegetables and adding them to guacamole with bacon. Pair with wedges of grilled pita for dipping, which is an unexpected alternative to typical chips.
For a main entree, Bayless suggests making meat the star and serving up ribeye steaks marinated in garlic, chilies and fresh lime juice. To cap off the meal, his go-to dessert is grilled cornmeal pound cake, served warm and topped with ice cream, berries or whipped cream.

Find more grilling gadgets and helpful cooking videos and tips for your next summer cookout at macys.com.

Photos courtesy of Getty Images

SOURCE:
eLivingToday.com

Big Flavor Recipes for Summer Get-Togethers

0
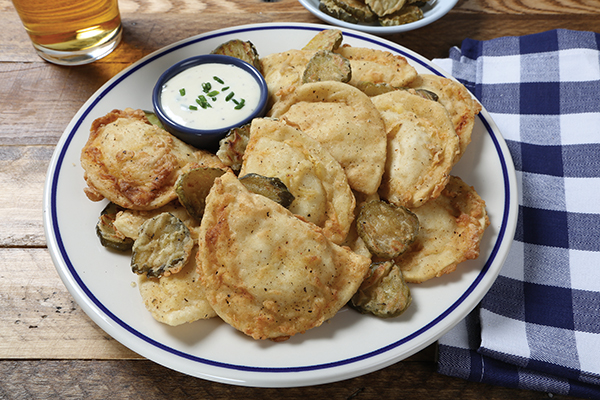
Chicken-Fried Pierogies Recipe

From patio potlucks to backyard barbecues, summer is the ultimate time to kick back and enjoy delicious food with your favorite people. If you’re looking to add big flavor to your warm-weather menu, get inspired by these recipes from celebrity chef Jose Garces.

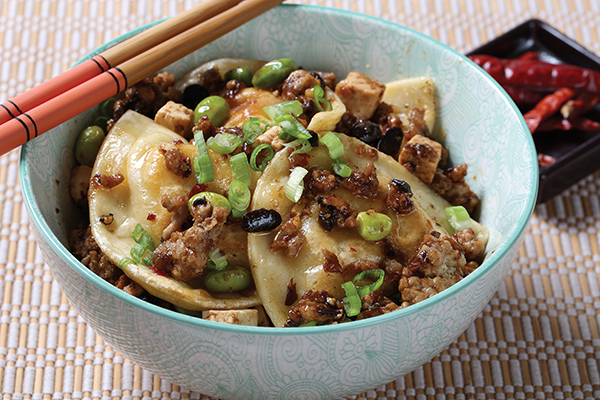
For a taste of Southern cooking, pair Classic Cheddar Pierogies with a buttermilk ranch sauce in Garces’s Chicken-Fried Pierogies. Also enjoy a delicious twist on an Asian favorite by serving up Garces’s Szechuan-Style Pierogies featuring savory Garlic & Parmesan Pierogies, one of 16 different varieties from Mrs. T’s Pierogies, which are the perfect canvas for your favorite ingredients and spices.

For more recipe inspiration, visit MrsTsPierogies.com.

Chicken-Fried Pierogies

Recipe courtesy of Chef Jose Garces

Flour Dredge:

  • 1 1/2    cups all-purpose flour
  • 1 1/2    tablespoons kosher salt
  • 2          teaspoons freshly ground black pepper
  • 1 1/2    teaspoons freshly ground white peppercorn
  • 1          teaspoon sweet paprika
  • 1          teaspoon onion powder
  • 1/8       teaspoon ground dried sage
  • 1/8       teaspoon dried thyme
  • 1/8       teaspoon cayenne pepper

Pierogies:

  • 1          box (16 ounces) Mrs. T’s Classic Cheddar Pierogies
  • 1          cup buttermilk
  • 2          eggs, lightly beaten
  • 2          cups flour dredge (recipe below)
  • canola oil
  • large kosher pickles, cut into round slices
  • ranch dressing
  1. To make flour dredge: In large mixing bowl, mix all flour dredge ingredients until thoroughly combined.
  2. To make pierogies: Bring large pot of water to boil. Place pierogies in boiling water until no longer frozen in center, about 2 minutes. Remove pierogies from water and cool in refrigerator 10 minutes.
  3. Place buttermilk, eggs and flour dredge in three separate bowls. One at a time, dip pierogies in buttermilk then in eggs and finally in flour dredge. Once all pierogies are dredged, fry in deep fryer at 350 F in canola oil, approximately 3 minutes until golden brown. Repeat flour dredge process with pickle slices and fry 3 minutes.
  4. To serve, place fried pierogies and pickles on serving plate. Serve with ranch.

Szechuan-Style Pierogies

Recipe courtesy of Chef Jose Garces

  • 1/2       cup, plus 2 tablespoons, vegetable oil, divided
  • 3          Arbol chilies
  • 1/4       cup Szechuan chili sauce
  • 4          tablespoons, plus 2 teaspoons, fresh minced ginger, divided
  • 2          tablespoons, plus 1 teaspoon, garlic, minced (about 5 cloves), divided
  • 1/2       tablespoon Szechuan peppercorns, toasted and ground
  • 1/2       cup black bean garlic sauce
  • 2          cups chicken stock
  • 1          tablespoon thinly sliced scallion (white parts only)
  • 1          cup ground pork
  • 1          teaspoon soy sauce
  • 1          tablespoon unsalted butter
  • 1          box (16 ounces) Mrs. T’s Garlic & Parmesan Pierogies
  • 1          tablespoon peeled edamame
  • 2          tablespoons firm tofu, diced
  • 1 1/2    cups bean sprouts
  1. Place 1/2 cup oil and chilies in saucepan. Cook over low heat 2 minutes, or until chilies turn brown. Remove chilies from oil and discard oil.
  2. Add Szechuan sauce to saucepan; cook 3 minutes. Add 4 tablespoons ginger, 2 tablespoons minced garlic and ground peppercorns; cook until fragrant, about 2 minutes. Add black bean sauce and cook another 2 minutes. Add chicken stock and bring to boil. Reduce heat to simmer and cook 20 minutes. Reserve.
  3. In saute pan, heat 1 tablespoon vegetable oil over medium-high heat. Add remaining ginger, remaining garlic and scallions; cook 1 minute. Add pork and cook 5 minutes, breaking up with wooden spoon. Add soy sauce and combine. Reserve.
  4. In saute pan, melt butter and remaining vegetable oil. Add pierogies and sear lightly, about 7 minutes on each side until lightly browned. Reserve.
  5. In large saute pan, combine Szechuan sauce, ground pork mixture, seared pierogies, edamame and tofu. Cook over medium-high heat until combined, about 2 minutes. Garnish with bean sprouts.

SOURCE:
Mrs. T’s Pierogies

Reach New Heights with a Reinvented Burger

0
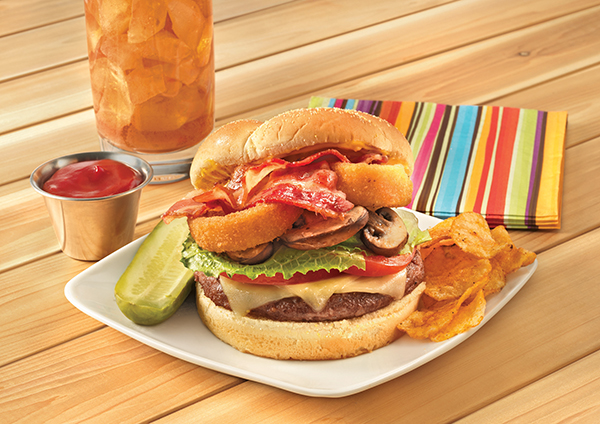
Six-Mile High Burger Recipe

Text your friends, dust off your apron and fire up the grill. It’s time to throw a barbecue party that won’t sink your summer budget.  

You can find everything you’ll need at a one-stop shop like ALDI. With savings up to 50 percent over traditional grocers, you can fill your cart with summer essentials like fresh seasonal produce, premium meats and award-winning wines.

Once shopping is out of the way, you’ll have plenty of time and money to experiment with new recipes. These quick and affordable tips can up your grill game and impress guests:

Boost your burgers. Take burgers to the next level this summer with your favorite ground meats such as turkey, chicken and beef. Then layer on the toppings like avocado, kale, gourmet cheeses and more.

Change up your take on cheesy. Top your burger with a blue cheese mousse by simply blending blue cheese crumbles and cream cheese then season it with your favorite spices.

Spice up your condiments. Combine mayonnaise with fresh orange juice and fresh orange zest to make a citrus aioli or whip up a special sauce by mixing peanut butter with oil and hot water. Sprinkle with bacon for some extra flavor. Toppings such as a pickled red onion can also add a bit of crunch and zest.

Bite better buns. Forgo traditional burger buns and bookend your masterpiece with brioche buns or pretzel rolls.

Find more great grilling tips and recipes for dishes to enjoy all summer at aldi.us.

Six-Mile High Burger

Recipe courtesy of ALDI Test Kitchen

  • 1          tablespoon Carlini Vegetable Oil
  • 10        Baby Bella mushrooms, sliced
  • 8          pieces Specially Selected Center Cut Bacon
  • 8          Season’s Choice Whole Onion Rings
  • 4          All Natural 80 percent Lean Ground Beef Patties
  • 8          slices Happy Farms Pepper Jack Cheese
  • 1          cup Burman’s Mayonnaise
  • 1/4       cup Burman’s Hot Sauce
  • 1/2       cup Burman’s Mustard
  • 1/4       teaspoon Stonemill Iodized Salt
  • 1/4       teaspon Stonemill Ground Black Pepper
  • 4          L’oven Fresh Hamburger Buns
  • 1          tomato, sliced
  • 2          romaine lettuce leaves, cut in half width-wise
  1. Heat grill to medium-high.
  2. In saute pan, heat vegetable oil and saute mushrooms 2-3 minutes. Set aside. Fry bacon to desired doneness, about 5 minutes on each side. Set aside. Bake onion rings according to packaging instructions. Set aside.
  3. Grill burgers 5-7 minutes on each side until they reach desired doneness. Place two slices cheese on each burger and continue to grill until melted. Remove from heat.
  4. Mix together mayonnaise, hot sauce, mustard, salt and pepper, and spread on both sides of buns, to taste.
  5. To assemble burger: layer bottom bun with patty with cheese, tomato, lettuce, mushrooms, two onion rings, two pieces of bacon and top half of bun.

SOURCE:
ALDI

Preparing for Baby

0
4 tips for choosing the right car seat

As a parent, one of the most important decisions you will make is choosing an infant car seat. The process of purchasing and correctly installing a car seat can often feel like an overwhelming task.  

To help give parents that extra layer of confidence they need before baby’s first car ride home from the hospital, the safety experts at Car Seats for the Littles offer these tips for proper car seat installation and car seat use.

Keep Children 2 Years and Younger Rear-Facing
Babies have heavy heads and fragile necks. The neck bones are flexible and the ligaments are loose to allow for growth. When a child rides rear-facing, his or her whole body is cradled by the back of the safety seat in the event of a crash, which is why you want to keep your child rear-facing for as long as possible. The American Academy of Pediatrics recommends keeping your baby rear-facing until at least 2 years old.

Ensure Correct Car Seat Installation
A study by the National Highway Traffic Safety Administration shows that 49 percent of infant car seats are installed incorrectly. Faulty installation can result in preventable injuries, so it’s important the infant car seat is properly installed. First, ensure the car seat you purchase works in your vehicle and read the manufacturer’s instruction manual. A car seat with a simple installation process, like the Graco SnugRide SnugLock 35 DLX Infant Car Seat, can help eliminate some of the installation guesswork. The base offers hassle-free installation using either the vehicle’s seat belt or a Lower Anchors and Tethers for Children (LATCH) system. In three simple steps, parents will hear an audible “click” and feel confident the car seat has been securely installed. This seat also features a four-position, one-hand adjustable recline with an easy-to-read bubble level indicator to determine the proper recline level. Find more information at gracobaby.com.

Properly Position Newborns in Car Seats
Be sure the newborn’s bottom is all the way back with no space behind him or her and that the child isn’t slouching. Additionally, check to make sure the seat is sufficiently reclined to prevent the baby’s head from falling to his or her chest and potentially blocking the airway.

Test for Proper Installation and Security
Before placing baby in a car seat, perform the “1-inch test.” Give the seat a firm shake at the belt path with your non-dominant hand. If the seat or base moves less than 1 inch, the installation is secure. Once baby is properly positioned in the seat, make sure the harness straps are properly tightened using the pinch test. With the chest clip placed at armpit level, pinch the strap at your child’s shoulder. If you are unable to pinch any excess webbing, your child is properly secured.

One of the most cautious drives you’ll ever take is the first one home from the hospital, but with the right infant car seat, proper research and installation practice, you can feel more confident from the moment you leave the hospital and every drive after.

SOURCE:
Graco

Renovations for the Ages

0
Antique upgrades for kitchen and bath

Not every renovation project is intended to make the space look shiny and new. A design that celebrates decades (or even centuries) past can carry the same big impact for a dramatically updated look.

Antique upgrades celebrate the old-timey charm that modern design often ignores. An added benefit to an antique motif: the opportunity to display family heirlooms and treasures from previous generations that blend seamlessly into your home.

In most houses, the kitchen and bathrooms are where modern conveniences are most obvious. The appliances and fixtures in these rooms offer convenience and function few homeowners are willing to sacrifice for the sake of aesthetics. Fortunately, these tips show how you can capture old-world ambiance while enjoying the comforts of modern living.

Back-to-basics bathroom
Indoor plumbing is arguably the greatest asset of the modern home, but there’s no need to sacrifice contemporary function when you take a step back in time with your bathroom decor. A claw foot tub makes for a stunning focal point, and a stylish pedestal sink adds character a modern vanity simply can’t deliver.

The one downside, limited storage space, can be easily remedied. A distressed cupboard or cabinet fitted with an antique window pane door is a simple DIY solution, or rely on stacked wooden crates (sanded and finished, of course) for a whimsical tower to fill with towels and other necessities.

In a small space like a bathroom, it can be difficult to evoke just the right impression with fixtures and furnishings alone. That’s where accessories can play a transformative role. Rely on historic photographs, vintage mirrors and antique curios such as old buckets and chairs to let your creativity run wild. A bucket makes a perfect toilet paper holder and the rungs of a forgotten old chair are ideal for an old-fashioned towel rack.

Old-meets-new kitchen
For a kitchen stylized to honor the past, there’s nothing more distracting than modern appliances. Fully capturing the warmth and charm of a country, century or Victorian kitchen requires complementing antique-style appliances. With careful attention to vintage design, a line like Elmira Stove Works’ appliances complete the traditional feel of a “vintage” kitchen, rather than detract from it, as would modern-style black, white or stainless steel.

Fortunately, the “antique” aspect of these appliances ends with the appearance, as the complete line features the latest in cooking technology to ease routine food preparation and meet the high standards of the home chef.

For example, among the features is a full-size, self-cleaning true convection oven with the look of a vintage two-door range. The front panel displaying the “fire door,” “oven door” and “ash catch” conceals the full-size oven behind. A matching 1,200-watt microwave features a removable turntable, 10 power levels, turbo-defrost and five-stage programmable cooking with an optional nickel or antique copper door frame.

The complete line includes a customizable collection of ranges, wall ovens, microwaves, refrigerators and matching panels for dishwashers. To learn more, visit ElmiraStoveWorks.com.

SOURCE:
Elmira Stove Works

Royal Migration

0
The annual monarch butterfly journey

The annual monarch butterfly journey


Every year, monarch butterflies embark on a 3,000-mile migration across North America. This feat of endurance lasts eight months, spans three countries and captivates people worldwide.

These graceful pollinators rely on milkweed for feeding and reproduction, but over the last decade, a reduction of milkweed habitats has occurred along the butterflies’ flight path. The decline of any species can be a threat to natural diversity.

When the weather starts to warm each year, monarchs make their way north from Mexico to begin breeding. Upon arriving in Texas, the butterflies begin to lay eggs on milkweed. Milkweed is the sole food source for monarch larvae, more commonly known as caterpillars. As milkweed plantings have diminished, so has the monarch population.


Environmentalists and butterfly lovers have taken notice of the monarchs’ dwindling numbers. BASF, a company that serves farmers and agricultural customers, launched Living Acres in 2015. Living Acres is a research initiative designed to help farmers establish milkweed beds in non-cropland areas.

“The goal is to raise awareness about the important role milkweed plays in the monarch life cycle,” said Laura Vance, biology team lead, BASF. “We also want to make milkweed planting easier by researching the most efficient ways to raise it and then offer that knowledge to growers nationwide.”


Farmers and landowners can play an important role in helping increase monarch populations simply by starting a milkweed garden. With employee-tended monarch gardens, BASF is also sustaining butterflies at its manufacturing sites. The gardens are tended to ensure the milkweed is healthy and ready for the arrival of monarchs.

As summer approaches, caterpillars begin their metamorphoses, hatching and transforming into vivid orange and black butterflies.

“If you have milkweed planted somewhere in your yard, be sure to keep an eye out for those mesmerizing monarchs,” Vance said. “You just never know when one might flutter by.”

Once mature, the monarchs continue their journey northward, passing over cool valleys and prairieland. Monarchs look for resting places in open plains, often settling in beds of milkweed. Prime milkweed habitats include areas alongside cornfields, gardens, playgrounds and rural roadsides.

Some of the most popular flight paths include the Corn Belt and Interstate 35, a corridor that runs from Texas to Minnesota. Legislators implemented a federal plan to create habitable space along highways for monarchs by planting milkweed in ditches. This initiative offers food and shelter for weary butterflies and provides nursery sites for monarch eggs.

Monarchs then begin winging their way south to the oyamel fir forests of Mexico. They spend their winters there, crowded together on the tree branches for warmth, which can appear to transform the trees into blazing orange clouds. When warm weather returns the following year, monarchs resume their migration northward and continue the cycle of breeding the next monarch generation.

Establishing your own milkweed habitat is a great way to get involved and make an impact on the continued reign of the monarch butterfly. For planting tips, visit Living Acres at Facebook.com/BASFLivingAcres.

Photo courtesy of Getty Images

SOURCE:
BASF

Peanut Apple Chicken Curry

0
Peanut Apple Chicken Curry

Recipe courtesy of Jess A., Berkeley, California
Serves: 4

Sauce:

  • 1 tablespoon olive oil
  • 2 cloves garlic, minced
  • 2 teaspoons curry powder
  • 1/4 cup scallions, chopped
  • 1 cup creamy peanut butter
  • 2 teaspoons rice wine vinegar
  • 1 3/4 cups apple juice
  • 1 3/4 cups coconut milk
  • 1/4 cup brown sugar
  • 1/4 teaspoon cayenne pepper (optional)

Chicken:

  • 2 tablespoons olive oil
  • 1/2 small yellow onion, chopped
  • 1 1/2 pounds boneless, skinless chicken breast, cut into 1-inch strips
  • 1 medium apple, peeled, cored and chopped
  • salt, to taste
  • pepper, to taste
  • cooked rice (optional)
  1. To make sauce: In medium to large saucepan, heat oil over medium heat. Add garlic, curry powder and scallions. Saute 1 minute.
  2. Add peanut butter, vinegar, apple juice, coconut milk, brown sugar and cayenne. Bring to simmer, reduce heat and cook over low heat, stirring frequently, about 10-15 minutes.
  3. Meanwhile, in large skillet, heat oil. Add onion and stir fry about 2-3 minutes until onions start to become opaque.
  4. Add chicken and apples, and stir until chicken is cooked completely. Add peanut sauce and cook until heated evenly, about 2-5 minutes. Season with salt and pepper, to taste. Serve warm over rice, if desired.

Graceland Mini Cupcakes

0
Graceland Mini Cupcakes

Graceland Mini Cupcakes
Recipe courtesy of Linda D., Coconut Creek, Florida
Serves: 36

Cupcakes:

  • 2 cups all-purpose flour
  • 2 teaspoons baking powder
  • 1/2 teaspoon salt
  • 4 ripe bananas
  • 1/2 cup light sour cream
  • 4 tablespoons unsalted butter, at room temperature
  • 2 tablespoons canola oil
  • 3/4 cups sugar
  • 2 large eggs, at room temperature
  • 1 large egg white, at room temperature
  • 1 teaspoon vanilla extract

Peanut Butter Filling:

  • 1/4 cup creamy peanut butter

Bacon Topping:

  • 4 slices bacon
  • 1/2 cup brown sugar

Frosting:

  • 8 ounces low-fat cream cheese
  • 1/2 cup butter
  • 1/2 cup creamy peanut butter
  • 2 teaspoons vanilla extract
  • 3/4 cups confectioners’ sugar
  1. Heat oven to 350°F. Line cupcake tins with paper liners and lightly spray with cooking spray.
  2. To make batter: In medium bowl, combine flour, baking powder and salt. Stir to combine and set aside.
  3. In small bowl, mash bananas and add sour cream. Mix well and set aside.
  4. Using electric hand mixer, beat butter, oil and sugar until incorporated, about 3-5 minutes. Add eggs, egg white and vanilla. Mix until combined. Slowly add half the dry ingredients and mix until almost incorporated. Add sour cream and banana mixture and gently fold into batter. Add rest of dry ingredients until combined.
  5. Spoon batter into lined cupcake pans. Bake 18-20 minutes and let cool.
  6. After cooling about 30-45 minutes, use paring knife to cut small circle in middle of top of cupcakes and remove plug, creating a well about halfway down cupcake. Add peanut butter to piping bag and fill each hole. Set aside.
  7. In medium bowl, dredge both sides of bacon slices in brown sugar. Place on foil-lined baking sheet; bake 10 minutes. Flip and bake another 6-8 minutes. Remove bacon from oven and place on plate to cool. Once cool, chop bacon and set aside.
  8. To make frosting: In large bowl, combine cream cheese, butter, peanut butter and vanilla extract. Mix until combined. Add confectioners’ sugar and mix until well-combined.
  9. Add frosting to piping bag. Pipe a dollop of frosting onto each cupcake and sprinkle with candied bacon pieces.

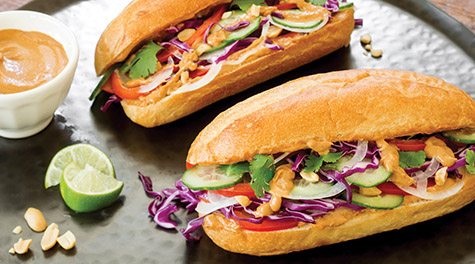
Veggie Sammies with Peanut Butter Satay Sauce

0
Veggie Sammies with Peanut Butter Satay Sauce

Recipe courtesy of Ben M., San Francisco, California
Serves: 2

  • 4 tablespoons creamy peanut butter
  • 3 tablespoons lime juice
  • 2 tablespoons water
  • 4 teaspoons hoisin sauce
  • 2 teaspoons soy sauce
  • 2 teaspoons sriracha
  • 2 French baguette rolls (6 inches each)
  • 1/2 cup sliced cucumber
  • 1/2 cup white onion
  • 1/2 cup red bell pepper
  • 1/2 cup purple cabbage
  • 1/2 cup fresh cilantro
  1. In small bowl, combine peanut butter, lime juice, water, hoisin sauce, soy sauce and sriracha. Mix well.
  2. Spread sauce on both sides of bread then layer with cucumber, onion and bell pepper. Top with cabbage and cilantro leaves.

Special Offer

Popular Stories

Carter's Most Loved Sale is Live, Here's What to Buy - Family Life Tips Magazine

Carter’s Most Loved Sale is Live, Here’s What to Buy

0
Carter's Most Loved Sale is Live, Here's What to Buy (BPT) - Carter’s is starting off the year with a bang, launching its first-ever Most...

Special Offer

Parents Helping Child with School Homework

Hey there, Super Parent!

Navigating family life can be a rollercoaster ride! How about some expert advice, fun activity ideas and parenting hacks to make it smoother? Subscribe to Family Life Tips Magazine now and transform your everyday parenting challenges into joyful experiences!

You have Successfully Subscribed!